

- Time: about 20 minutes, most of it spent watching the build.
- Cost: a first build plus a publish fits inside the credits a new account starts with. See How credits work.
Prerequisites
- A web browser. There is nothing to install.
- An email address, or a Google account.
You can start at app.skarmy.ai without an account — Skarmy signs you in as a guest the moment you arrive, and you can talk to the coach right away. You create your account when you open the Builder, and everything you started as a guest carries over.
The example used here
This guide builds one fictional company all the way through, so you can follow along with your own idea in the same shape.Kilnwork — an example, not a real business. A small ceramics studio that runs weekend workshops and wants a site where people can see the class schedule and register interest.Substitute your own idea at every step. The instructions do not change.
Build it
1
Open Skarmy and describe your idea
Go to app.skarmy.ai. You land on Home, with a sidebar on the left and the heading What’s your idea? in the middle.In the box below the heading, type your idea in plain language. One or two sentences is plenty — the coach will ask about anything it needs.For the example:Press Enter or select the send button.Expected result: the page becomes a conversation, your message appears, and the coach replies.
2
Answer the coach's questions
The coach reacts to your specific idea and asks a question or two — usually about a real tension in the idea rather than a checklist.Answer in your own words. Two or three exchanges is normal. If you would rather stop talking and start building, say so; the coach will hand off immediately.Expected result: the coach summarises what it is handing over, and an Open Builder button appears in the conversation.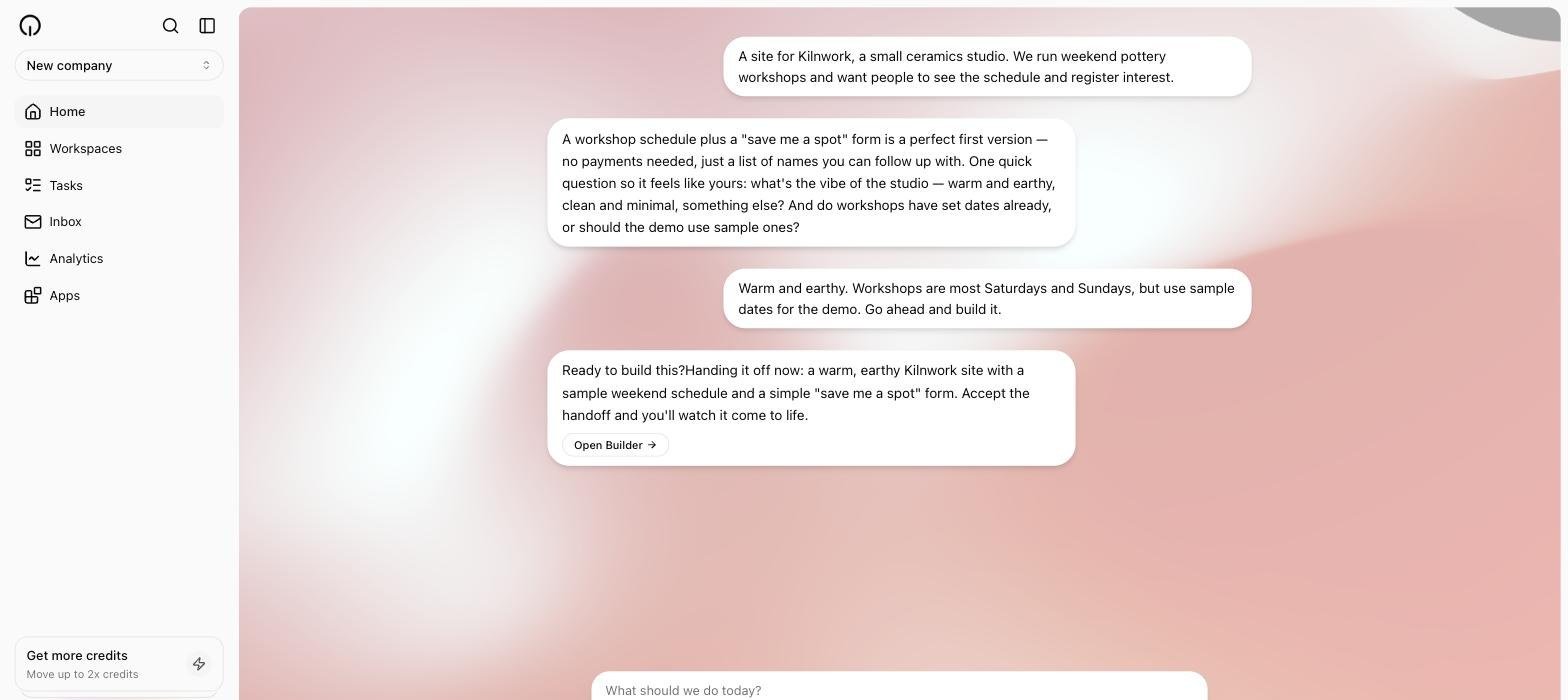
3
Open the Builder and create your account
Select Open Builder.If you have been working as a guest, this is where Skarmy asks you to sign up: Create an account to use the builder. Fill in your name, email, and password, or select Continue with Google. Your projects come with you — everything you started as a guest is linked to your new account.Expected result: the workspace opens — the conversation on the left, a preview pane on the right showing
preview starting… while the Builder sets up.4
Name your company
While your company is unnamed, Skarmy asks what to call it — a card above the composer reading What do you want to call your company? Type a name into the Company name… field and select Save. For the example,
Kilnwork.You can also name it at any moment by telling the coach: Call my company Kilnwork.Expected result: the name updates in the sidebar immediately.5
Watch the first version appear
The Builder scaffolds the app, starts it running, and writes real pages and copy. Progress appears in the conversation as it goes — 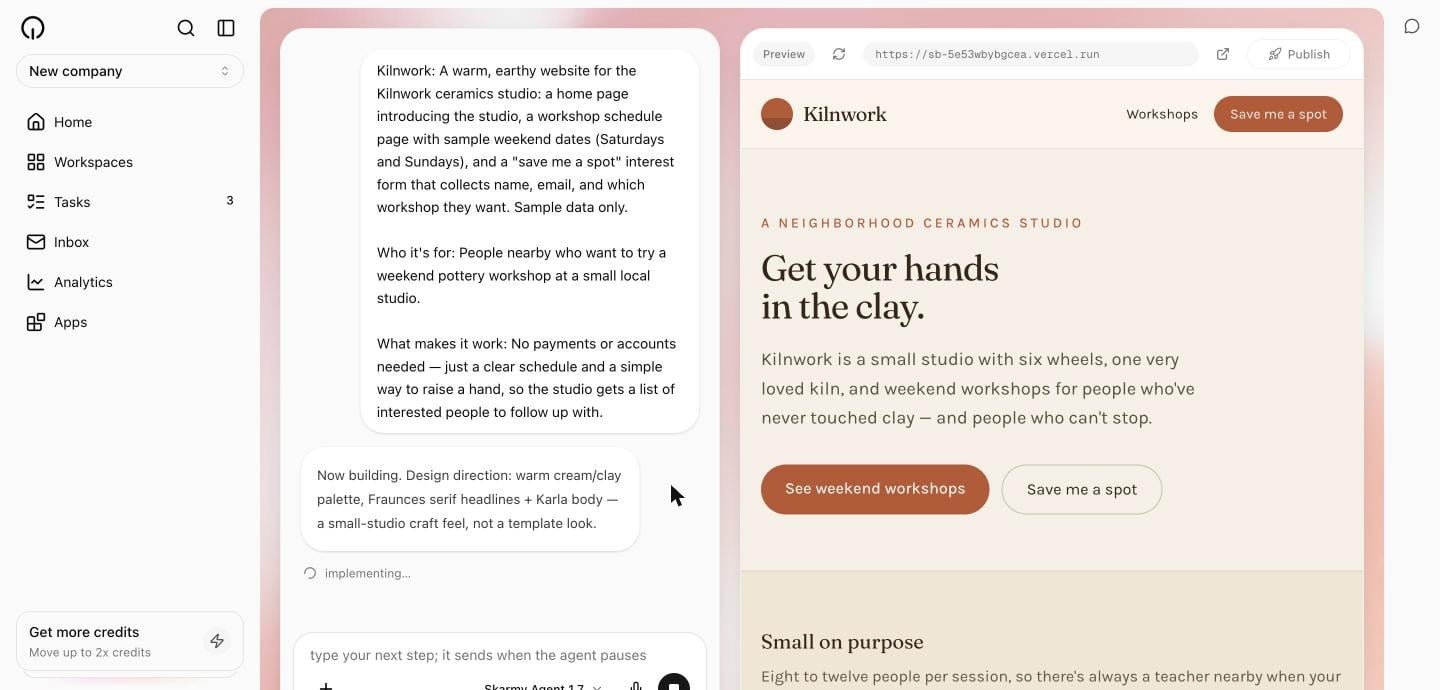
thinking…, implementing…, and so on.When the app is up, the preview switches from the starting message to your actual site, and reloads itself each time the Builder changes something.If the Builder hits a genuinely ambiguous choice, it asks you one focused question with two or three options. Pick one and select Send answer.Expected result: a working site in the preview, and a short summary in the conversation describing what was built.A first build takes a few minutes. The preview pane stays honest about its state — see Read the live preview for what each message means.
6
Ask for one change
Type a change into the conversation, exactly as you would ask a colleague. For the example:Expected result: the Builder makes the change and the preview updates. Small edits are quick.
7
Publish it
Select Publish at the top of the workspace. Because this is your first publish, a dialog appears titled Name your site.Type the name you want. Your address is that name plus
.skarmy.ai — for the example, kilnwork gives kilnwork.skarmy.ai. The hint under the field tells you whether the name is available.Next, Skarmy shows Review before publishing — the exact version going out, that the audience is the public internet, and what it costs. Select Approve and publish. Nothing deploys without this approval.Expected result: the button reads Deploying…, then a Live at yourname.skarmy.ai link appears. Open it — that is your site, on the public internet.Verify it worked
Check each of these before you call it done:- The sidebar shows your company name, not Untitled Company.
- The preview pane shows your site, not a starting or asleep message.
- The conversation contains the Builder’s summary of what it built.
- The change you asked for in step 6 is visible in the preview.
- A Live at … link appears beside the Publish button.
- Opening that link in a new tab loads your site.
- The site loads on your phone as well as your laptop.
All seven checked? You have built and shipped a working product. Send the link to someone.
If something went wrong
Next steps
Your first build is done, and Skarmy is only getting started. Tomorrow there will be a fresh slate of suggested tasks on your Tasks page.Keep building
How to ask for changes that land the way you meant them.
Work your daily tasks
Skarmy suggests what to do next, every day.
Understand credits
What building costs and when your allowance resets.